Have you ever wondered about the history of a product and the design and manufacturing process required to get the finished product? Fashion products are particularly studied in this regard and when it comes to accessories developed by major brands, the issue of production optimisation comes into play. So what is the secret to creating a product that is both original and qualitative? Here is the story of life, cap version!
THE CAP: A STORY OF STRUCTURE!
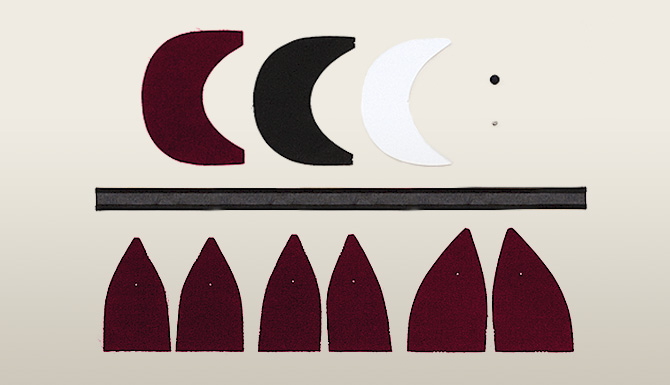
Before you even pick up a needle, determine the shape you want. Thus, the visor, the closing system and the number of sides should be defined in advance. Once you have decided on the shape and the fabrics you want, come the crucial stage of cutting the panels that make up the crown as well as the parts that will serve as the visor. You will cut 2 side panels, 2 top panels and 1 front panel if you want a 5 panel, whereas a snapback requires 4 side panels and 2 back panels. This is a step that requires knowledge of geometry and a perfect mastery of scissors if you are not lucky enough to benefit from industrialized systems.

Once the cuts have been made, it is now a question of making the visor by assembling two fabrics and sliding a thin layer of cardboard between them to maintain the shape of the cardboard that you have pressed to give it its flat or curved form. This way you have something to protect your eyes from the sun... but not the rest of your head!
The crown then needs to be sewn on and to do this you need to bring the different parts of the cap together, which is no easy task. The sewing is done from the top of the crown for snapbacks and other 6-panel caps, while it is done from front to back for 5-panel caps. These details make all the difference and ensure a professional look if done properly! Don't forget to insert a nice lining of fine fabric that absorbs sweat in case of heat stroke and will prevent it from rubbing off on the outer fabric.
DESIGN IS MATERIAL-PROOF!
Once all the material elements are assembled, you can tackle the most fun but nerve-wracking part: embroidering your chosen design. While it is possible to embroider each cap individually, most major brands invest in multi-head sewing machines that, like sewing the yokes, embroider logos and designs at the speed of light (or almost)! These systems come in very handy when you consider that a medium-sized logo can require up to 800 stitches of embroidery!
Now all that remains is to assemble the visor to the crown and sew the sweatband to the inside of the cap, much to the delight of sportsmen and women! In order to refine the design of the product and assert its image, the next step is to add small embroidered elements such as the brand's logo and other small graphic fantasies that designers are capable of!
Then you can add the famous plastic or leather adjustment tabs and the button at the top of the crown, which can be fixed with a press or simply with good old glue. Who could believe that a machine as imposing as this one allows only to fix this small "Top Button"?
A TASTE FOR DETAIL AS THE KEY WORD!
Once this meticulous surgery has been carried out, the cap needs to gain strength and undergoes the "steam chamber" stage. The steam allows the fibres to relax and the cap takes on the desired final shape thanks to a press. Like a pizza dough, your cap must then be left to rest. All these steps have exhausted it and it must now be placed on the "cooling rack", a kind of coat rack that allows the cap to recover before the last step, the sticker! If it is not compulsory, it is however recommended because it gives the little professional touch to the product: a round sticker in gold or silver glossy paper on which your brand will be proudly mentioned!
Finally, to make sure that your efforts to produce a quality product have not been in vain, wrap them in tissue paper before placing them in the packing boxes. Your caps are ready to be shipped and admired by the most discerning connoisseurs of this mythical headgear!
Producing a cap therefore requires a certain amount of skill and patience. Did you know that a cap from the American giant New Era is produced in about forty minutes and passes through the expert hands of about twenty employees?
For those who don't have the talent and/or patience to make their own cap, we invite you to discover our selection: men's cap, women's cap but also a large choice of children's cap.
